Introduction
Overview
Teaching: 10 min
Exercises: 0 minQuestions
What is CWL?
What is the goal of this training?
Objectives
Gain a high level understanding of the example analysis.
Introduction to Common Worklow Language
The Common Workflow Language (CWL) is an open standard for describing automated, batch data analysis workflows. Unlike many programming languages, CWL is a declarative language. This means it describes what should happen, but not how it should happen. This enables workflows written in CWL to be portable and scalable across a variety of software and hardware environments, from workstations to cluster, cloud, and high performance computing (HPC) environments. As a standard with multiple implementations, CWL is particularly well suited for research collaboration, publishing, and high-throughput production data analysis.
Introduction to the example analysis
This training uses a bioinformatics RNA-seq analysis as a motivating example. However, specific knowledge of the biology of RNA-seq is not required for these lessons. For those unfamiliar with RNA-seq, it is the process of sequencing RNA present in a biological sample. From the sequence reads, we want to measure the relative numbers of different RNA molecules appearing in the sample that were produced by particular genes. This analysis is called “differential gene expression”.
The entire process looks like this:
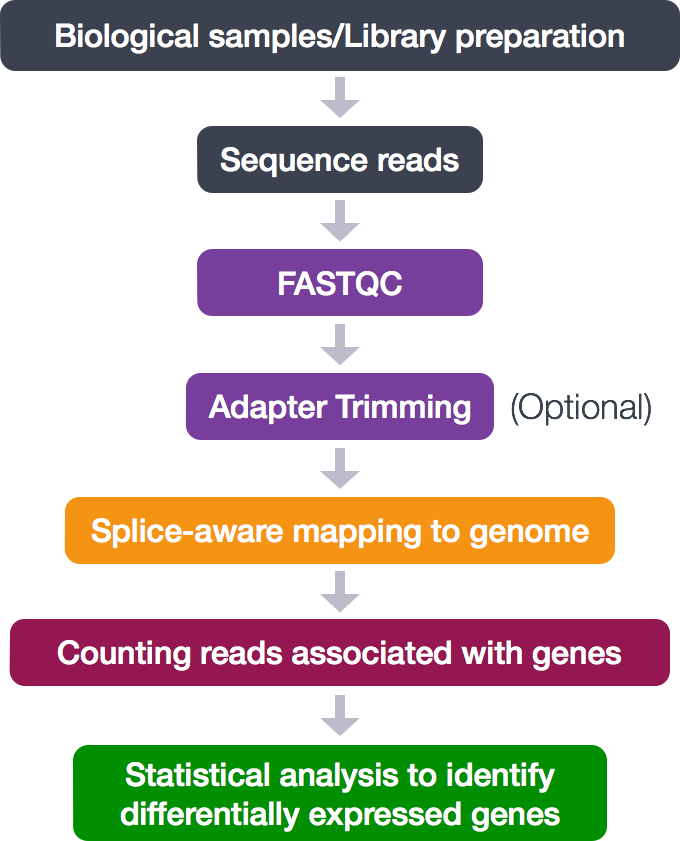
For this training, we are only concerned with the middle analytical steps (skipping adapter trimming).
- Quality control (FASTQC)
- Alignment (mapping)
- Counting reads associated with genes
In this training, we do not develop the analysis from first principals, instead we we will be starting from an analysis already written as a shell script, which will be presented in lesson 2.
Key Points
Common Workflow Language is a standard for describing data analysis workflows
We will use an bioinformatics RNA-seq analysis as an example workflow, but does not require in-depth knowledge of biology.
After completing this training, you should be able to begin writing workflows for your own analysis, and know where to learn more.
Create a Workflow by Composing Tools
Overview
Teaching: 30 min
Exercises: 10 minQuestions
What is the syntax of CWL?
What are the key components of a workflow?
Objectives
Write a workflow based on the source shell script, making use of existing tool wrappers.
Source shell script
In this lesson, we will develop an initial workflow inspired by the following shell script.
rnaseq_analysis_on_input_file.sh
#!/bin/bash

# Based on
# https://hbctraining.github.io/Intro-to-rnaseq-hpc-O2/lessons/07_automating_workflow.html
#

# This script takes a fastq file of RNA-Seq data, runs FastQC and outputs a counts file for it.
# USAGE: sh rnaseq_analysis_on_input_file.sh <name of fastq file>

set -e

# initialize a variable with an intuitive name to store the name of the input fastq file
fq=$1

# grab base of filename for naming outputs
base=`basename $fq .subset.fq`
echo "Sample name is $base"

# specify the number of cores to use
cores=4

# directory with genome reference FASTA and index files + name of the gene annotation file
genome=rnaseq/reference_data
gtf=rnaseq/reference_data/chr1-hg19_genes.gtf

# make all of the output directories
# The -p option means mkdir will create the whole path if it
# does not exist and refrain from complaining if it does exist
mkdir -p rnaseq/results/fastqc
mkdir -p rnaseq/results/STAR
mkdir -p rnaseq/results/counts

# set up output filenames and locations
fastqc_out=rnaseq/results/fastqc
align_out=rnaseq/results/STAR/${base}_
counts_input_bam=rnaseq/results/STAR/${base}_Aligned.sortedByCoord.out.bam
counts=rnaseq/results/counts/${base}_featurecounts.txt

echo "Processing file $fq"

# Run FastQC and move output to the appropriate folder
fastqc $fq

# Run STAR
STAR --runThreadN $cores --genomeDir $genome --readFilesIn $fq --outSAMtype BAM SortedByCoordinate --outSAMunmapped Within

# Create BAM index
samtools index $counts_input_bam

# Count mapped reads
featureCounts -T $cores -s 2 -a $gtf -o $counts $counts_input_bam
CWL Syntax
CWL documents are written using a format called “YAML”. Here is a crash-course in YAML:
Data fields are written with the name, followed by a colon :, a space,
and then the value.
fieldName: value
The value is the remaining text to the end of the line.
Special characters in YAML include :, {, } [, ], #, !
and %. If your text begins with any of these characters, you must
surround the string in single or double quotes.
fieldName: "#quoted-value"
You can write multi-line text by putting |- and writing an indented
block. The leading whitespace will be removed from the actual value.
fieldName: |-
  This is a multi-
  line string.
  Horray!
Nested sections are indented:
section1:
  field1: value1
  field2: value2
Nested sections can also be wrapped in curly brackets. In this case, fields must be comma-separated.
section1: {field1: value1, field2, value2}
When each item is on its own line starting with a dash -, it is a list.
section2:
  - value1
  - value2
List can also be wrapped in square brackets. In this case, values must be comma-separated.
section2: [value1, value2]
Comments start with #.
# This is a comment about field3
field3: stuff

field4: stuff # This is a comment about field4
Finally, YAML is a superset of JSON. Valid JSON is also valid YAML, so you may sometimes see JSON format being used instead of YAML format for CWL documents.
Workflow header
Create a new file “main.cwl”
Let’s start with the header.
cwlVersion: v1.2
class: Workflow
label: RNAseq CWL practice workflow
- cwlVersion - Every file must include this. It declares the version of CWL in use.
- class - This is the type of CWL document. We will see other types in future lessons.
- label - Optional title of your workflow.
Workflow Inputs
The purpose of a workflow is to consume some input parameters, run a series of steps, and produce output values.
For this analysis, the input parameters are the fastq file and the reference data required by STAR.
In the source shell script, the following variables are declared:
# initialize a variable with an intuitive name to store the name of the input fastq file
fq=$1

# directory with genome reference FASTA and index files + name of the gene annotation file
genome=rnaseq/reference_data
gtf=rnaseq/reference_data/chr1-hg19_genes.gtf
In CWL, we will declare these variables in the inputs section.
The inputs section lists each input parameter and its type. Valid
types include File, Directory, string, boolean, int, and
float.
In this case, the fastq and gene annotation file are individual files. The STAR index is a directory. We can describe these inputs in CWL like this:
inputs:
  fq: File
  genome: Directory
  gtf: File
Workflow Steps
A workflow consists of one or more steps. This is the steps section.
Now we need to describe the first step of the workflow. In the source
script, the first step is to run fastqc.
# Run FastQC and move output to the appropriate folder
fastqc $fq
A workflow step consists of the name of the step, the tool to run,
the input parameters to be passed to the tool in in, and the output
parameters expected from the tool in out.
The value of run references the tool file. The tool file describes
how to run the tool (we will discuss how to write tool files in lesson
4). If we look in bio-cwl-tools (which you should have imported
when setting up a practice repository in the initial setup
instructions) we find bio-cwl-tools/fastqc/fastqc_2.cwl.
Next, the in block is mapping of input parameters to the tool and
the workflow parameters that will be assigned to those inputs. We
need to know what input parameters the tool accepts.
Let’s open up the tool file and take a look:
Find the inputs section of bio-cwl-tools/fastqc/fastqc_2.cwl:
inputs:

  reads_file:
    type:
      - File
    inputBinding:
      position: 50
    doc: |
      Input bam,sam,bam_mapped,sam_mapped or fastq file
Now we know we need to provide an input parameter called reads_file.
Next, the out section is a list of output parameters from the tool
that will be used later in the workflow, or as workflow output. We
need to know what output parameters the tool produces. Find the
outputs section of bio-cwl-tools/fastqc/fastqc_2.cwl:
outputs:

  zipped_file:
    type:
      - File
    outputBinding:
      glob: '*.zip'
  html_file:
    type:
      - File
    outputBinding:
      glob: '*.html'
  summary_file:
    type:
      - File
    outputBinding:
      glob: |
        ${
          return "*/summary.txt";
        }
Now we know to expect an output parameter called html_file.
Putting this all together, the fastq step consists of a run, in
and out subsections, and looks like this:
steps:
  fastqc:
    run: bio-cwl-tools/fastqc/fastqc_2.cwl
    in:
      reads_file: fq
    out: [html_file]
Running alignment with STAR
The next step is to run the STAR aligner.
# Run STAR
STAR --runThreadN $cores --genomeDir $genome --readFilesIn $fq --outSAMtype BAM SortedByCoordinate --outSAMunmapped Within
We will go through the same process as the first section. We find
there is bio-cwl-tools/STAR/STAR-Align.cwl. We will open the file
and look at the inputs section to determine what input parameters
correspond to the command line parmeters from our source script.
Exercise
Look at
STAR-Align.cwland identify the input parameters that correspond to the command line arguments used in the source script:--runThreadN,--genomeDir,--outSAMtype, and--outSAMunmapped. Also identify the name of the output parameter.Solution
--runThreadN→RunThreadN--genomeDir→GenomeDir--readFilesIn→ForwardReads--outSAMtype→OutSAMtype,SortedByCoordinate--outSAMunmapped→OutSAMunmappedoutput parameter name:
alignment
Command line flags
Command line flags generally appear appear in either the
argumentsfield, or theprefixfield of theinputBindingsection of an input parameter declaration. For example, this section ofSTAR-Align.cwltells us that theGenomeDirinput parameter corresponds to the--genomeDircommand line parameter.GenomeDir: type: Directory inputBinding: prefix: "--genomeDir"
Default values
Sometimes we want to provide input values to a step without making them as workflow-level inputs. We can do this with
{default: N}. For example:in: RunThreadN: {default: 4}
Exercise
Using the input and output parameters identified in the previous exercise, write the
run,inandoutsections of the STAR step.Solution
  STAR:
    run: bio-cwl-tools/STAR/STAR-Align.cwl
    in:
      RunThreadN: {default: 4}
      GenomeDir: genome
      ForwardReads: fq
      OutSAMtype: {default: BAM}
      SortedByCoordinate: {default: true}
      OutSAMunmapped: {default: Within}
    out: [alignment]
Running samtools
The third step is to generate an index for the aligned BAM.
# Create BAM index
samtools index $counts_input_bam
For this step, we need to use the output of a previous step as input
to this step. We refer the output of a step by with name of the step
(STAR), a slash, and the name of the output parameter (alignment), e.g. STAR/alignment
This creates a dependency between steps. This means the samtools
step will not run until the STAR step has completed successfully.
  samtools:
    run: bio-cwl-tools/samtools/samtools_index.cwl
    in:
      bam_sorted: STAR/alignment
    out: [bam_sorted_indexed]
featureCounts
# Count mapped reads
featureCounts -T $cores -s 2 -a $gtf -o $counts $counts_input_bam
As of this writing, the subread package that provides
featureCounts is not available in bio-cwl-tools (and if it has been
added since then, let’s pretend that it isn’t there.) We will go over
how to write a CWL wrapper for a command line tool in lesson 4. For
now, we will leave off the final step.
Workflow Outputs
The last thing to do is declare the workflow outputs in the outputs section.
For each output, we need to declare the type of output, and what parameter has the output value.
Output types are the same as input types, valid types include File,
Directory, string, boolean, int, and float.
The outputSource field refers the a step output in the same way that
the in block does, the name of the step, a slash, and the name of
the output parameter.
For our final outputs, we want the results from fastqc and the aligned, sorted and indexed BAM file.
outputs:
  qc_html:
    type: File
    outputSource: fastqc/html_file
  bam_sorted_indexed:
    type: File
    outputSource: samtools/bam_sorted_indexed
Episode solution
Key Points
CWL documents are written using a syntax called YAML.
The key components of the workflow are: the header, the inputs, the steps, and the outputs.
Running and Debugging a Workflow
Overview
Teaching: 15 min
Exercises: 20 minQuestions
How do I provide input to run a workflow?
What should I do if the workflow fails?
Objectives
Write an input parameter file.
Execute the workflow.
Diagnose workflow errors.
The input parameter file
CWL input values are provided in the form of a YAML or JSON file. create a called file
This file gives the values for parameters declared in the inputs
section of our workflow. Our workflow takes fq, genome and gtf
as input parameters.
When setting inputs, Files and Directories are given as an object with
class: File or class: Directory. This distinguishes them from
plain strings that may or may not be file paths.
Note: if you don’t have example sequence data or the STAR index files, see setup.
main-input.yaml
fq:
  class: File
  location: keep:9178fe1b80a08a422dbe02adfd439764+925/raw_fastq/Mov10_oe_1.subset.fq
  format: http://edamontology.org/format_1930
genome:
  class: Directory
  location: keep:02a12ce9e2707610991bd29d38796b57+2912
gtf:
  class: File
  location: keep:9178fe1b80a08a422dbe02adfd439764+925/reference_data/chr1-hg19_genes.gtf
Running the workflow
If you are using VSCode with Arvados tasks, select
main.cwland then use theRun CWL Workflow on Arvadostask.
main-input.yaml
fq:
  class: File
  location: rnaseq/raw_fastq/Mov10_oe_1.subset.fq
  format: http://edamontology.org/format_1930
genome:
  class: Directory
  location: hg19-chr1-STAR-index
gtf:
  class: File
  location: rnaseq/reference_data/chr1-hg19_genes.gtf
Running the workflow
Type this into the terminal:
cwl-runner main.cwl main-input.yamlThis may take a few minutes to run, and will print some amount of logging. The logging you see, how access other logs, and how to track workflow progress will depend on your CWL runner platform.
Debugging the workflow
Depending on whether and how your workflow platform enforces memory limits, your workflow may fail. Let’s talk about what to do when a workflow fails.
A workflow can fail for many reasons: some possible reasons include bad input, bugs in the code, or running out memory. In our example, the STAR workflow may fail with an out of memory error.
To help diagnose these errors, the workflow runner produces logs that record what happened, either in the terminal or the web interface.
Some errors you might see in the logs that would indicate an out of memory condition:
EXITING: fatal error trying to allocate genome arrays, exception thrown: std::bad_alloc
Possible cause 1: not enough RAM. Check if you have enough RAM 5711762337 bytes
Possible cause 2: not enough virtual memory allowed with ulimit. SOLUTION: run ulimit -v 5711762337
or
Container exited with code: 137
(Exit code 137 most commonly occurs when a container goes “out of memory” and is terminated by the operating system).
If this happens, you will need to request more RAM.
Setting runtime RAM requirements
By default, a step is allocated 256 MB of RAM. From the STAR error message:
Check if you have enough RAM 5711762337 bytes
We can see that STAR requires quite a bit more RAM than 256 MB. To request more RAM, add a “requirements” section with “ResourceRequirement” to the “STAR” step:
  STAR:
    requirements:
      ResourceRequirement:
        ramMin: 9000
    run: bio-cwl-tools/STAR/STAR-Align.cwl
	...
Resource requirements you can set include:
- coresMin: CPU cores
- ramMin: RAM (in megabytes)
- tmpdirMin: temporary directory available space
- outdirMin: output directory available space
Running the workflow
Now that you’ve fixed the workflow, run it again.
Episode solution
Workflow results
The CWL runner will print a results JSON object to standard output. It will look something like this (it may include additional fields).
{
    "bam_sorted_indexed": {
        "basename": "Aligned.sortedByCoord.out.bam",
        "class": "File",
        "location": "keep:2dbaaef5aefd558e37f14280e47091a9+327/Aligned.sortedByCoord.out.bam",
        "secondaryFiles": [
            {
                "basename": "Aligned.sortedByCoord.out.bam.bai",
                "class": "File",
                "location": "keep:2dbaaef5aefd558e37f14280e47091a9+327/Aligned.sortedByCoord.out.bam.bai"
            }
        ],
        "size": 25370695
    },
    "qc_html": {
        "basename": "Mov10_oe_1.subset_fastqc.html",
        "class": "File",
        "location": "keep:2dbaaef5aefd558e37f14280e47091a9+327/Mov10_oe_1.subset_fastqc.html",
        "size": 383589
    }
}
{
    "bam_sorted_indexed": {
        "location": "file:///home/username/rnaseq-cwl-training-exercises/Aligned.sortedByCoord.out.bam",
        "basename": "Aligned.sortedByCoord.out.bam",
        "class": "File",
        "size": 25370707,
        "secondaryFiles": [
            {
                "basename": "Aligned.sortedByCoord.out.bam.bai",
                "location": "file:///home/username/rnaseq-cwl-training-exercises/Aligned.sortedByCoord.out.bam.bai",
                "class": "File",
                "size": 176552,
            }
        ]
    },
    "qc_html": {
        "location": "file:///home/username/rnaseq-cwl-training-exercises/Mov10_oe_1.subset_fastqc.html",
        "basename": "Mov10_oe_1.subset_fastqc.html",
        "class": "File",
        "size": 383589
    }
}
This has a similar structure as main-input.yaml. The each output
parameter is listed, with the location field of each File object
indicating where the output file can be found.
Key Points
The input parameter file is a YAML file with values for each input parameter.
A common reason for a workflow step fails is insufficient RAM.
Use ResourceRequirement to set the amount of RAM to be allocated to the job.
Output parameter values are printed as JSON to standard output at the end of the run.
Writing a Tool Wrapper
Overview
Teaching: 20 min
Exercises: 30 minQuestions
What are the key components of a tool wrapper?
How do I use software containers to supply the software I want to run?
Objectives
Write a tool wrapper for the featureCounts tool.
Find an software container that has the software we want to use.
Add the tool wrapper to our main workflow.
It is time to add the last step in the analysis.
# Count mapped reads
featureCounts -T $cores -s 2 -a $gtf -o $counts $counts_input_bam
This will use the “featureCounts” tool from the “subread” package.
File header
A CommandLineTool describes a single invocation of a command line program. It consumes some input parameters, runs a program, and captures output, mainly in in the form of files produced by the program.
Create a new file “featureCounts.cwl”
Let’s start with the header. This is very similar to the workflow, except that we use class: CommandLineTool.
cwlVersion: v1.2
class: CommandLineTool
label: featureCounts tool
Command line tool inputs
The inputs section describes input parameters with the same form as
the Workflow inputs section.
Exercise
The variables used in the bash script are
$cores,$gtf,$countsand$counts_input_bam.
- $cores is the number of CPU cores to use.
- $gtf is the input .gtf file
- $counts is the name we will give to the output file
- $counts_input_bam is the input .bam file
Write the
inputssection for the File inputsgtfandcounts_input_bam.Solution
inputs:
  gtf: File
  counts_input_bam: File
Specifying the program to run
Give the name of the program to run in baseCommand.
baseCommand: featureCounts
Command arguments
The easiest way to describe the command line is with an arguments
section. This takes a comma-separated list of command line arguments.
arguments: [-T, $(runtime.cores),
            -a, $(inputs.gtf),
            -o, featurecounts.tsv,
            $(inputs.counts_input_bam)]
Input variables are included on the command line as
$(inputs.name_of_parameter). When the tool is executed, the
variables will be replaced with the input parameter values.
There are also some special variables. The runtime object describes
the resources allocated to running the program. Here we use
$(runtime.cores) to decide how many threads to request.
argumentsvsinputBindingYou may recall from examining existing the fastqc and STAR tools wrappers in lesson 2, another way to express command line parameters is with
inputBindingandprefixon individual input parameters.inputs: parametername: type: parametertype inputBinding: prefix: --some-optionWe use
argumentsin the example simply because it is easier to see how it lines up with the source shell script.You can use both
inputBindingandargumentsin the same CommandLineTool document. There is no “right” or “wrong” way, and one does not override the other, they are combined to produce the final command line invocation.
Outputs section
In CWL, you must explicitly identify the outputs of a program. This associates output parameters with specific files, and enables the workflow runner to know which files must be saved and which files can be discarded.
In the previous section, we told the featureCounts program the name of
our output files should be featurecounts.tsv.
We can declare an output parameter called featurecounts that will
have that output file as its value.
The outputBinding section describes how to determine the value of
the parameter. The glob field tells it to search for a file in the
output directory called featurecounts.tsv
outputs:
  featurecounts:
    type: File
    outputBinding:
      glob: featurecounts.tsv
Running in a container
In order to run the tool, it needs to be installed. Using software containers, a tool can be pre-installed into a compatible runtime environment, and that runtime environment (called a container image) can be downloaded and run on demand.
Although plain CWL does not require the use of containers, many popular platforms that run CWL do require the software be supplied in the form of a container image.
Finding container images
Many bioinformatics tools are already available as containers. One resource is the BioContainers project. Let’s find the “subread” software:
- Visit https://biocontainers.pro/
- Click on “Registry”
- Search for “subread”
- Click on the search result for “subread”
- Click on the tab “Packages and Containers”
- Choose a row with type “docker”, then on the right side of the “Full Tag” column for that row, click the “copy to clipboard” button.
To declare that you want to run inside a container, add a section called
hintsto your tool document. Underhintsadd a subsectionDockerRequirement. UnderDockerRequirement, paste the text your copied in the above step. Replace the textdocker pulltodockerPull:ensure it is indented twice so it is a field ofDockerRequirement.Answer
hints:
  DockerRequirement:
    dockerPull: quay.io/biocontainers/subread:1.5.0p3--0
Running a tool on its own
When creating a tool wrapper, it is helpful to run it on its own to test it.
The input to a single tool is the same kind of input parameters file that we used as input to a workflow in the previous lesson.
featureCounts.yaml
counts_input_bam:
  class: File
  location: Aligned.sortedByCoord.out.bam
gtf:
  class: File
  location: rnaseq/reference_data/chr1-hg19_genes.gtf
Running the tool
Run the tool on its own to confirm it has correct behavior:
cwl-runner featureCounts.cwl featureCounts.yaml
Adding it to the workflow
Now that we have confirmed that the tool wrapper works, it is time to add it to our workflow.
Exercise
- Add a new step called
featureCountsthat runs our tool wrapper. The new step should take input fromsamtools/bam_sorted_indexed, and should be allocated a minimum of 500 MB of RAM- Add a new output parameter for the workflow called
featurecountsThe output source should come from the output of the newfeatureCountsstep.- When you have an answer, run the updated workflow, which should run the “featureCounts” step and produce “featurecounts” output parameter.
Answer
steps:
  ...
  featureCounts:
    requirements:
      ResourceRequirement:
        ramMin: 500
    run: featureCounts.cwl
    in:
      counts_input_bam: samtools/bam_sorted_indexed
      gtf: gtf
    out: [featurecounts]

outputs:
  ...
  featurecounts:
    type: File
    outputSource: featureCounts/featurecounts
Episode solution
Key Points
The key components of a command line tool wrapper are the header, inputs, baseCommand, arguments, and outputs.
Like workflows, CommandLineTools have
inputsandoutputs.Use
baseCommandandargumentsto provide the program to run and the command line arguments to run it with.Use
globto capture output files and assign them to output parameters.Use DockerRequirement to supply the name of the Docker image that contains the software to run.
Analyzing Multiple Samples
Overview
Teaching: 30 min
Exercises: 30 minQuestions
How can you run the same workflow over multiple samples?
Objectives
Modify the workflow to process multiple samples, then perform a joint analysis.
In the previous lesson, we completed converting the function of the original source shell script into CWL. This lesson expands the scope by demonstrating what changes to make to the workflow to be able to analyze multiple samples in parallel.
Subworkflows
In addition to running command line tools, a workflow step can also execute another workflow.
First, copy main.cwl to alignment.cwl.
Next, open main.cwl for editing. We are going to replace the steps and outputs sections.
Remove all the steps and replace them with a single alignment step
which invokes the alignment.cwl we just copied.
steps:
  alignment:
    run: alignment.cwl
    in:
      fq: fq
      genome: genome
      gtf: gtf
    out: [qc_html, bam_sorted_indexed, featurecounts]
In the outputs section, all the output sources are from the alignment step:
outputs:
  qc_html:
    type: File
    outputSource: alignment/qc_html
  bam_sorted_indexed:
    type: File
    outputSource: alignment/bam_sorted_indexed
  featurecounts:
    type: File
    outputSource: alignment/featurecounts
We also need add “SubworkflowFeatureRequirement” to tell the workflow runner that we are using subworkflows:
requirements:
  SubworkflowFeatureRequirement: {}
Running the workflow
Run this workflow. You should get exactly the same results as before, as all we have done so far is to wrap the inner workflow with an outer workflow.
Part 1 solution
Scattering
The “wrapper” step lets us do something useful. We can modify the
outer workflow to accept a list of files, and then invoke the inner
workflow step for every one of those files. We will need to modify
the inputs, steps, outputs, and requirements sections.
First we change the fq parameter to expect a list of files:
inputs:
  fq: File[]
  genome: Directory
  gtf: File
Next, we add scatter to the alignment step. The means we want to
run run alignment.cwl for each value in the list in the fq
parameter.
steps:
  alignment:
    run: alignment.cwl
    scatter: fq
    in:
      fq: fq
      genome: genome
      gtf: gtf
    out: [qc_html, bam_sorted_indexed, featurecounts]
Because the scatter produces multiple outputs, each output parameter becomes a list as well:
outputs:
  qc_html:
    type: File[]
    outputSource: alignment/qc_html
  bam_sorted_indexed:
    type: File[]
    outputSource: alignment/bam_sorted_indexed
  featurecounts:
    type: File[]
    outputSource: alignment/featurecounts
We also need add “ScatterFeatureRequirement” to tell the workflow runner that we are using scatter:
requirements:
  SubworkflowFeatureRequirement: {}
  ScatterFeatureRequirement: {}
Part 2 solution
Input parameter lists
The fq parameter needs to be a list. You write a list in yaml by
starting each list item with a dash. Example main-input.yaml
fq:
  - class: File
    location: rnaseq/raw_fastq/Mov10_oe_1.subset.fq
    format: http://edamontology.org/format_1930
  - class: File
    location: rnaseq/raw_fastq/Mov10_oe_2.subset.fq
    format: http://edamontology.org/format_1930
  - class: File
    location: rnaseq/raw_fastq/Mov10_oe_3.subset.fq
    format: http://edamontology.org/format_1930
  - class: File
    location: rnaseq/raw_fastq/Irrel_kd_1.subset.fq
    format: http://edamontology.org/format_1930
  - class: File
    location: rnaseq/raw_fastq/Irrel_kd_2.subset.fq
    format: http://edamontology.org/format_1930
  - class: File
    location: rnaseq/raw_fastq/Irrel_kd_3.subset.fq
    format: http://edamontology.org/format_1930
genome:
  class: Directory
  location: hg19-chr1-STAR-index
gtf:
  class: File
  location: rnaseq/reference_data/chr1-hg19_genes.gtf
Running the workflow
Run this workflow. You will now get results for each one of the input fastq files.
Combining results
Each instance of the alignment workflow produces its own
featurecounts.tsv file. However, to be able to compare results
easily, we would like single file with all the results.
We can modify the workflow to run featureCounts once at the end of
the workflow, taking all the bam files listed on the command line.
We will need to change a few things.
First, in featureCounts.cwl we need to modify it to accept either a
single bam file or list of bam files.
inputs:
  gtf: File
  counts_input_bam:
   - File
   - File[]
Second, in alignment.cwl we need to remove the featureCounts step from alignment.cwl, as well as the featurecounts output parameter.
Third, in main.cwl we need to remove featurecounts from the alignment step
outputs, and add a new step:
steps:
  alignment:
    run: alignment.cwl
    scatter: fq
    in:
      fq: fq
      genome: genome
      gtf: gtf
    out: [qc_html, bam_sorted_indexed]
  featureCounts:
    requirements:
      ResourceRequirement:
        ramMin: 500
    run: featureCounts.cwl
    in:
      counts_input_bam: alignment/bam_sorted_indexed
      gtf: gtf
    out: [featurecounts]
Last, we modify the featurecounts output parameter. Instead of a
list of files produced by the alignment step, it is now a single
file produced by the new featureCounts step.
outputs:
  ...
  featurecounts:
    type: File
    outputSource: featureCounts/featurecounts
Running the workflow
Run this workflow. You will still have separate results from fastq and and STAR, but now you will only have a single
featurecounts.tsvfile with a column for each bam file.
Episode solution
Key Points
Separate the part of the workflow that you want to run multiple times into a subworkflow.
Use a scatter step to run the subworkflow over a list of inputs.
The result of a scatter is an array, which can be used in a combine step to get a single result.
Dynamic Workflow Behavior
Overview
Teaching: 20 min
Exercises: 10 minQuestions
What kind of custom logic can happen between steps?
Objectives
Customize the STAR output filename to use the input filename.
Organize files into directories.
Expressions on step inputs
You might have noticed that the output bam files are all named
Aligned.sortedByCoord.out.bam. This happens because because when we
call STAR, it gives the output a default file name.
During workflow execution, this is usually not a problem. The workflow runner is smart enough to know that these files are different and keep them separate. This can even make development easier by not having to worry about assigning unique file names to every file. Also, if we intend to discard the BAM files as intermediate results
However, it is a problem for humans interpreting the output. We can
fix this by setting the parameter OutFileNamePrefix on STAR. We
want the output filename to be based on the input filename.
In alignment.cwl, we can use valueFrom on the OutFileNamePrefix
input parameter to construct the output prefix from the input
filename.
requirements:
  StepInputExpressionRequirement: {}

steps:
  ...
  STAR:
    ...
    in:
      ForwardReads: fq
      ...
      OutFileNamePrefix: {valueFrom: "$(inputs.ForwardReads.nameroot)."}
The code between $(...) is called an “expression”. It is evaluated
when setting up the step to run, and the expression is replaced by the
result to get the parameter value.
An expression can refer to other inputs to the step that are either directly connected to another value, or have a default value. Here, we refer to the input parameter ForwardReads, which is our fastq input file.
ForwardReads is a File object, not a plain file name, so it has some
fields of its own. The file object has a number of fields that we can
use. These include basename (the name of the file, without a
directory), size (file size, in bytes), nameext (the last file
extension) and nameroot (the name with nameext removed). Using
Finally, our expression is embedded in a string, so after replacing
the expression with the value of inputs.ForwardReads.nameroot, it
adds the remainder of the string, which just is a dot .. This is to
separate the leading part of our filename from the “Aligned.bam”
extension that will be added by STAR.
Organizing output files into Directories
You probably noticed that all the output files appear in the same directory. You might prefer that each file appears in its own directory. This will show you how to do that.
Unlike shell scripts, in CWL you cannot call mkdir and mv to
organize files into directories. This is because the output files, at
this point, do not actually exist together in one directory. They may
exist on different nodes, in different directories, or different cloud
buckets. In CWL, instead of moving files around directly, you tell
the runner you want your directory to look like, and it will create it
for you.
We can use an “expression” to create a Directory object describing
each of our directories. An expression is a piece of Javascript code
which is executed by the workflow runner to produce values that affect
the workflow. These can be a simple as substituting the value of an
input variable, or as complex as en entire function that generates new
objects.
Javscript code must be bracketed inside $(...) or ${...}. The
difference comes down to syntax. The $() form is more compact but
can only include code that can appear on the right side of an
assignment (=), which cannot include control blocks like if or
for. The ${} form is a Javascript function, which can include
control blocks, and must end in a return statement.
Expressions can both appear in valueFrom fields as well as some
other fields, or in an ExpressionTool which, like Workflow or
CommandLineTool has explicitly defined inputs and outputs
sections.
The approach here is to define an expression tool which takes a
The Directory object has two fields, basename and listing. The
basename is the name of the directory, and the listing is the
contents, which consists of other File and Directory objects.
Create subdirs.cwl:
cwlVersion: v1.2
class: ExpressionTool
requirements:
  InlineJavascriptRequirement: {}
inputs:
  fq: File[]
  bams: File[]
  qc: File[]
outputs:
  dirs: Directory[]
expression: |-
  ${
  var dirs = [];
  for (var i = 0; i < inputs.bams.length; i++) {
    dirs.push({
      "class": "Directory",
      "basename": inputs.fq[i].nameroot,
      "listing": [inputs.bams[i], inputs.qc[i]]
    });
  }
  return {"dirs": dirs};
  }
Then change main.cwl:
steps:
  ...
  output-subdirs:
    run: subdirs.cwl
    in:
      fq: fq
      bams: alignment/bam_sorted_indexed
      qc: alignment/qc_html
    out: [dirs]
outputs:
  dirs:
    type: Directory[]
    outputSource: output-subdirs/dirs
  featurecounts:
    type: File
    outputSource: featureCounts/featurecounts
Running the workflow
Run the workflow. Look at the output. The BAM and fastqc files should now be organized into directories, with better naming of the bam files.
Episode solution
Key Points
CWL expressions allow you to use custom logic to determine input parameter values.
CWL ExpressionTool can be used to reshape data, such as declaring directories that should contain output files.
Resources for further learning
Overview
Teaching: 10 min
Exercises: 0 minQuestions
Where should I go to learn more?
Objectives
Become a part of the CWL community.
Hopefully you now have a basic grasp of the steps involved in developing a CWL workflow. There are many resources out there to further help you use CWL to solve your own scientific workflow problems.
CWL Reference
CWL Community
The CWL Forum is is best place to ask questions
Software resources
Github organization for repositories of CWL tool and workflow descriptions, including bio-cwl-tools.
Search for CWL files on Github, try adding the name of a tool you are interested in to the search
Key Points
Learn more advanced techniques from CWL user guide, by asking questions on the CWL forum and chat channel, and reading the specification.
Supplement: Creating Docker Images for Workflows
Overview
Teaching: 10 min
Exercises: 1 minQuestions
How do I create Docker images from scratch?
What some best practices for Docker images?
Objectives
Understand how to get started writing Dockerfiles
Common Workflow Language supports running tasks inside software containers. Software container systems (such as Docker) create an execution environment that is isolated from the host system, so that software installed on the host system does not conflict with the software installed inside the container.
Programs running inside a software container get a different (and generally restricted) view of the system than processes running outside the container. One of the most important and useful features is that the containerized program has a different view of the file system. A program running inside a container, searching for libraries, modules, configuration files, data files, etc, only sees the files defined inside the container.
This means that, usually, a given file path refers to different actual files depending from the persective of being inside or outside the container. It is also possible to have a file from the host system appear at some location inside the container, meaning that the same file appears at different paths depending from the persective of being inside or outside the container.
The complexity of translating between the container and its host environment is handled by the Common Workflow Language runner. As a workflow author, you only need to worry about the environment inside the container.
What are Docker images?
The Docker image describes the starting conditions for the container.
Most importantly, this includes starting layout and contents of the
container’s file system. This file system is typically a lightweight
POSIX environment, providing a standard set of POSIX utilities like a
sh, ls, cat, etc and organized into standard POSIX directories
like /bin and /lib.
The image is is made up of multiple “layers”. Each layer modifies the layer below it by adding, removing or modifying files to produce a new layer. This allows lower layers to be re-used.
Writing a Dockerfile
In this example, we will build a Docker image containing the
Burrows-Wheeler Aligner (BWA) by Heng Li. This is just for
demonstration, in practice you should prefer to use existing
containers from BioContainers, which
includes bwa.
Each line of the Docker file consists of a COMMAND in all caps, following by the parameters of that command.
The first line of the file will specify the base image that we are going to build from. As mentioned, images are divided up into “layers”, so this tells Docker what to use for the first layer.
FROM debian:10-slim
This starts from the lightweight (“slim”) Debian 10 Docker image.
Docker images have a special naming scheme.
A bare name like “debian” or “ubuntu” means it is an official Docker image. It has an implied prefix of “library”, so you may see the image referred to as “library/debian”. Official images are published on Docker Hub.
A name with two parts separated by a slash is published on Docker Hub
by someone else. For example, amazon/aws-cli is published by
Amazon. These can also be found on Docker Hub.
A name with three parts separated by slashes means it is published on
a different container register. For example,
quay.io/biocontainers/subread is published by quay.io.
Following image name, separated by a colon is the “tag”. This is typically the version of the image. If not provided, the default tag is “latest”. In this example, the tag is “10-slim” indicating Debian release 10.
The Docker file should also include a MAINTAINER (this is purely metadata, it is stored in the image but not used for execution).
MAINTAINER Peter Amstutz <peter.amstutz@curii.com>
Next is the default user inside the image. By making choosing root, we can change anything inside the image (but not outside).
The body of the Dockerfile is a series of RUN commands.
Each command is run with /bin/sh inside the Docker container.
Each RUN command creates a new layer.
The RUN command can span multiple lines by using a trailing
backslash.
For the first command, we use apt-get to install some packages that
will be needed to compile bwa. The build-essential package
installs gcc, make, etc.
RUN apt-get update -qy && \
	apt-get install -qy build-essential wget unzip
Now we do everything else: download the source code of bwa, unzip it,
make it, copy the resulting binary to /usr/bin, and clean up.
# Install BWA 07.7.17
RUN wget https://github.com/lh3/bwa/archive/v0.7.17.zip && \
	unzip v0.7.17 && \
	cd bwa-0.7.17 && \
	make && \
	cp bwa /usr/bin && \
	cd .. && \
	rm -rf bwa-0.7.17
Because each RUN command creates a new layer, having the build and
clean up in separate RUN commands would mean creating a layer that
includes the intermediate object files from the build. These would
then be carried around as part of the container image forever, despite
being useless. By doing the entire build and clean up in one RUN
command, only the final state of the file system, with the binary
copied to /usr/bin, is committed to a layer.
To build a Docker image from a Dockerfile, use docker build.
Use the -t option to specify the name of the image. Use -f if the
file isn’t named exactly Dockerfile. The last part is the directory
where it will find the Dockerfile and any files that are referenced
by COPY (described below).
docker build -t training/bwa -f Dockerfile.single-stage .
Exercise
Create a
Dockerfilebased on this lesson and build it for yourself.Solution
FROM debian:10-slim
MAINTAINER Peter Amstutz <peter.amstutz@curii.com>

RUN apt-get update -qy
RUN apt-get install -qy build-essential wget unzip zlib1g-dev

# Install BWA 07.7.17
RUN wget https://github.com/lh3/bwa/archive/v0.7.17.zip && \
	unzip v0.7.17 && \
	cd bwa-0.7.17 && \
	make && \
	cp bwa /usr/bin && \
	cd .. && \
	rm -rf bwa-0.7.17
Adding files to the image during the build
Using the COPY command, you can copy files from the source directory
(this is the directory your Dockerfile was located) into the image
during the build. For example, you have a requirements.txt next to
Dockerfile:
COPY requirements.txt /tmp/
RUN pip install --requirement /tmp/requirements.txt
Multi-stage builds
As noted, it is good practice to avoiding leaving files in the Docker image that were required to build the program, but not to run it, as those files are simply useless bloat. Docker offers a more sophisticated way to create clean builds by separating the build steps from the creation of the final container. These are called “multi-stage” builds.
A multi stage build has multiple FROM lines. Each FROM line is a
separate container build. The last FROM in the file describes the
final container image that will be created.
The key benefit is that the different stages are independent, but you can copy files from one stage to another.
Here is an example of the bwa build as a multi-stage build. It is a little bit more complicated, but the outcome is a smaller image, because the “build-essential” tools are not included in the final image.
# Build the base image.  This is the starting point for both the build
# stage and the final stage.
# the "AS base" names the image within the Dockerfile
FROM debian:10-slim AS base
MAINTAINER Peter Amstutz <peter.amstutz@curii.com>

# Install libz, because the bwa binary will depend on it.
# As it happens, this already included in the base Debian distribution
# because lots of things use libz specifically, but it is good practice
# to explicitly declare that we need it.
RUN apt-get update -qy
RUN apt-get install -qy zlib1g


# This is the builder image.  It has the commands to install the
# prerequisites and then build the bwa binary.
FROM base as builder
RUN apt-get install -qy build-essential wget unzip zlib1g-dev

# Install BWA 07.7.17
RUN wget https://github.com/lh3/bwa/archive/v0.7.17.zip
RUN unzip v0.7.17
RUN cd bwa-0.7.17 && \
    make && \
    cp bwa /usr/bin


# Build the final image.  It starts from base (where we ensured that
# libz was installed) and then copies the bwa binary from the builder
# image.  The result is the final image only has the compiled bwa
# binary, but not the clutter from build-essentials or from compiling
# the program.
FROM base AS final

# This is the key command, we use the COPY command described earlier,
# but instead of copying from the host, the --from option copies from
# the builder image.
COPY --from=builder /usr/bin/bwa /usr/bin/bwa
Best practices for Docker images
Docker has published guidelines on building efficient images.
Some additional considerations when building images for use with Workflows:
Store Dockerfiles in git, alongside workflow definitions
Dockerfiles are scripts and should be managed with version control just like other kinds of code.
Be specific about software versions
Instead of blindly installing the latest version of a package, or
checking out the master branch of a git repository and building from
that, be specific in your Dockerfile about what version of the
software you are installing. This will greatly aid the
reproducibility of your Docker image builds.
Similarly, be as specific as possible about the version of the base
image you want to use in your FROM command. If you don’t specify a
tag, the default tag is called “latest”, which can change at any time.
Tag your builds
Use meaningful tags on your own Docker image so you can tell versions of your Docker image apart as it is updated over time. These can reflect the version of the underlying software, or a version you assign to the Dockerfile itself. These can be manually assigned version numbers (e.g. 1.0, 1.1, 1.2, 2.0), timestamps (e.g. YYYYMMDD like 20220126) or the hash of a git commit.
Avoid putting reference data to Docker images
Bioinformatics tools often require large reference data sets to run. These should be supplied externally (as workflow inputs) rather than added to the container image. This makes it easy to update reference data instead of having to rebuild a new Docker image every time, which is much more time consuming.
Small scripts can be inputs, too
If you have a small script, e.g. a self-contained single-file Python script which imports Python modules installed inside the container, you can supply the script as a workflow input. This makes it easy to update the script instead of having to rebuild a new Docker image every time, which is much more time consuming.
Don’t use ENTRYPOINT
The ENTRYPOINT Dockerfile command modifies the command line that is
executed inside the container. This can produce confusion when the
command line that supplied to the container and the command that
actually runs are different.
Be careful about the build cache
Docker build has a useful feature where if it has a record of the
exact RUN command against the exact base layer, it can re-use the
layer from cache instead of re-running it every time. This is a great
time-saver during development, but can also be a source of
frustration: build steps often download files from the Internet. If
the file being downloaded changes without the command being used to
download it changing, it will reuse the cached step with the old copy
of the file, instead of re-downloading it. If this happens, use
--no-cache to force it to re-run the steps.
Episode solution
Key Points
Docker images contain the initial state of the filesystem for a container
Docker images are made up of layers
Dockerfiles consist of a series of commands to install software into the container.